Campfire orange cakes
A fun, yummy campfire cake activity. Plus, reflections on campfire cooking methods & why these cakes taste SO good!
Introduction
You can cook all sorts of cakes in oranges. Chocolate is the most popular and a packet cake-mix such as chocolate fudge makes a super-easy gooey chocolate orange cake.
We love a homemade cake and being outdoors is no barrier to traditional cooking - the key is getting the cooking heat even.
What you'll need
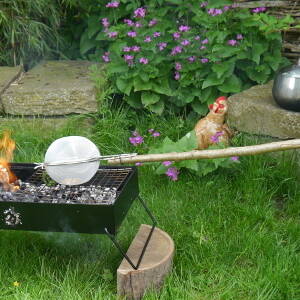
- campfire
- bowl
- chopping board
- knife
- spoon
- tin foil
- ingredients
This activity has been provided by
Useful items from our shop
Environmental Considerations
Consider the environmental impact of preparing, carrying out & completing this activity. Could this impact be reduced? Specific considerations for this activity could include:
- leave no trace
Health & Safety Considerations
Follow your usual operating procedures and carry out appropriate risk benefit assessments.
Some considerations particular to this activity include:
- fire safety
- hot food
- hand washing
Preparation:
Set up a clean work station with all your kitchen equipment ready.
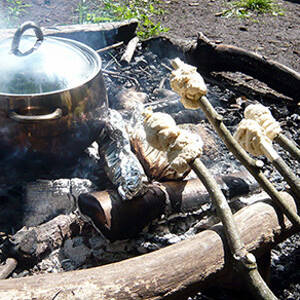
Light your campfire - it needs to be built up and then allowed to burn down to create an even ember bed for cooking in/next to.
Ingredients:
Bring your ingredients pre-measured in tubs.
Or, if you have more time and resources you can bring extra bowls and scales and facilitate your group to follow a recipe and measure out their own ingredients.
- 10 medium oranges
- 175g self-raising flour
- 1 tsp baking powder
- 125g caster sugar
- 125g unsalted butter
- 2 eggs
- 1 tsp vanilla extract
- Hot water
Optional ingredients:
- 50-100g ground almonds (halve the amount of vanilla if adding almonds)
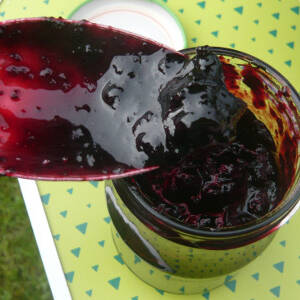
- Foraged or shop-bought berries - we used foraged bilberries
- Use some of the scooped-out orange flesh (reduce the amount of extra water)
Step #1 Making the cake mix
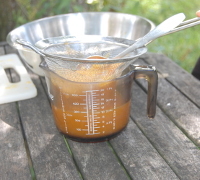
Put the flour and baking powder in a large bowl, add the sugar and mix.
Add the butter, eggs, vanilla extract and 1 tbsp hot water for consistency.
Beat until smooth.
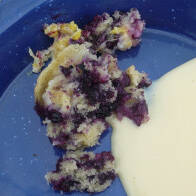
We made a standard sponge then added ground almonds – this worked well with the subtle orange flavor that infused the sponge.
As an afterthought we threw in a handful of our foraged bilberries – with a lovely result – the distinctive taste of the bilberries enhanced the taste of the sponge and also had a stunning visual appearance.
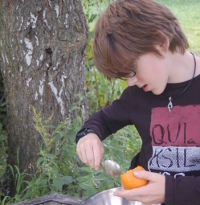
Step #2 Preparing the oranges
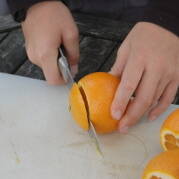
Slice off the top of the orange approx ¼ of the way down. This leaves a big enough hole to scoop out the orange effectively, yet enough ‘bowl’ to bake the cake in.
Getting the flesh of the orange out can be a little tricky – you need to cut away from your fingers while you are holding the orange as you are cutting – which is rather difficult.
We broke the removal of the pulp into little stages.
First we used a small sharp knife and cut out a controlled cone of orange.
Then we cut down into the flesh around the outside, as near to the pith as possible without cutting the skin.
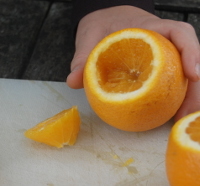
As we freed up some of the flesh we scooped it out into a bowl, eventually cutting away most of the flesh.
Then you can use a spoon to remove the remainder of the flesh until it is mainly pith remaining.
If possible (but not essential), try to cut out the skin of the segments as well, otherwise these bits will get baked in, making it slightly tricky to scoop out the cake after it has baked.
Prevent the juice attracting insects by placing the empty oranges and lids in an airtight container or plastic bag until you are ready to use them.
Step #3 Filling the oranges
If you are adding extra ingredients to the cake mix, fold them in now.
Fill the oranges half to two-thirds full with cake mixture.
Place the tops of the oranges back on.
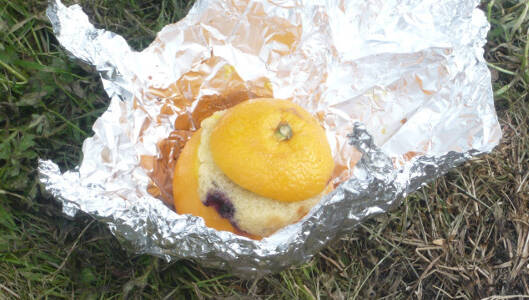
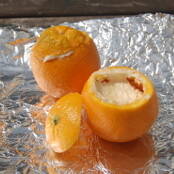
The orange in the photo was too full and oozed out, resulting in lots of mixture baked on the outside - see photo below.
Tip 1:
Every time I make baked oranges with this recipe I put too much cake mix in and it oozes out and cooks around the foil.
If your heat is just right this is not a problem but inevitably there will be hot-spots and the mixture that has oozed out will burn. So - unlike me - resist the urge to pack the mixture in - stick to half to two-thirds full!
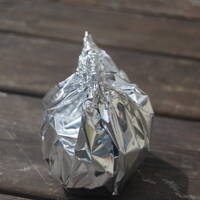
Wrap the filled orange, with its lid on, in tin foil.
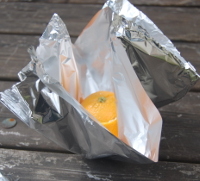
Tip 2:
We popped the orange in the centre of a square of foil, drew the corners up then rolled the foil down from the top – creating a pouch the juices could not escape from. This also made it easier to unfold to take a peek in to see if it was cooked.
Step #4 Cooking the oranges
The tricky bit is getting the right heat to bake them in – too hot and they can burn; not warm enough and they don’t cook.
Let your fire die down and nestle the oranges into the embers around the edge. The cakes can easily burn so it is important that the embers are not too hot.
Rotate the oranges and check them periodically to ensure they are cooking evenly.
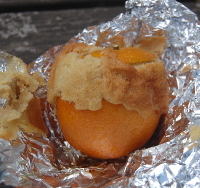
After about 15-30 mins your cakes should be done – test with a skewer or knife – if it comes out clean the cakes are cooked.
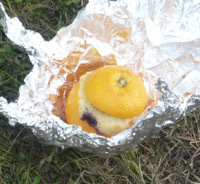
Hey presto! Orange sponges with bilberries!
Tip:
I have cooked these cakes in fire embers and not realised some of the embers were too hot – this burnt one side of the orange. The other side cooked perfectly but unfortunately the burn taste emanated through the whole cake making it inedible. So make sure your ember bed is not too hot and use the area outside the main fire to achieve this.
Alternatives - camp fire oven (Dutch oven):
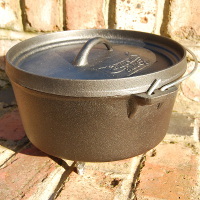
Learning by my mistakes, I have looked into other methods for baking on a fire, with the main aim of keeping the cakes away from direct heat - ideally with a surrounding heat. Dutch ovens with a baking spacer are great for this. An added bonus is you don’t need to wrap the oranges in tin foil, which makes it much easier to check the cakes as they are cooking.
Nestle the Dutch oven into the embers of a died-down fire and allow to pre-heat.
You can pop some grease-proof paper in the bottom of the oven to create a nest and to prevent juices and cake sticking to the oven base. Place the oranges in this nest.
If the embers are still quite hot you’ll need to keep the cakes from touching the sides of the oven. I had an absolute disaster with some – they were sitting on the bottom of the Dutch oven and totally burnt, so the key is to make sure the embers are not too hot – if in doubt aim for absolutely no direct heat.
Alternatives - baking in an enamel pan:
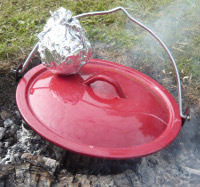
On another trip I did not have my Dutch oven but I did have my enamel pan – so I improvised.
My aim was to keep the oranges from direct heat so i didn’t want them touching the bottom or the sides. I put an upside-down enamel plate in the bottom of the pan and arranged the oranges so that they were not resting against the bottom or sides.
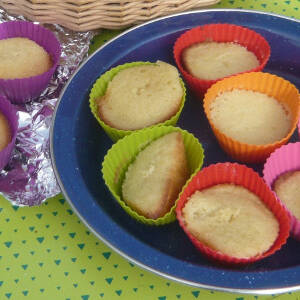
I also popped the remaining cake mixture into silicone bun cases (see campfire buns) that I also kept from touching the sides.
I placed the pot into the embers, popped on the lid, and cooked.
Why did they taste so good?:
After a beautiful day foraging (see foraging for wellbeing) we built a campfire to cook dinner. Once the fire had died down we left the cakes to cook using the embers whilst we played rounders – running back often to check they were not burning.
We ate them hot with custard whilst watching an amazing sunset and it tasted out of this world – none of us could believe how good they were, especially me!
But why did they taste so fab??
Was it because we had had an enjoyable afternoon picking the berries and building an appetite whilst on the hillsides? We did lots of climbing and playing too. Or was it that we needed to wait patiently for the fire to burn, then die back, before we could bake our cakes? Or was it that food always tastes better when eaten outdoors? Or while enjoying the company of our friends and their children? Or was it because they actually did taste fab?!
Who knows, but everyone talks about THAT camping trip where we picked bilberries and made cake and bilberry jam outdoors. There have been plenty of requests to go back again this year
Take it further:
- squeeze out the flesh to make a refreshing orange juice
- explore other items that can be cooked with their skins on – such as bananas and potatoes.
Disclaimer: Muddy Faces cannot take any responsibility for accidents or damage that occurs as a result of following this activity.You are responsible for making sure the activity is conducted safely.
Key Features
- Age Range 3+
- Duration 1 - 2 Hours
- Location Anywhere
- Season Any
- Time of Day Anytime
-
Categories:
Food Outdoors
campfire recipes