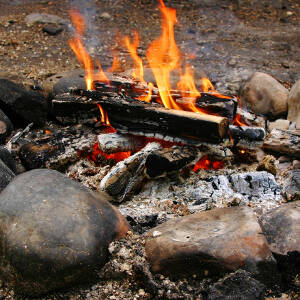
Fires: fire area preparation
A comprehensive guide to preparing and building a fire area in an outdoor setting.
Introduction
This guide includes comprehensive information and points to consider around the resources needed, planning, location, design considerations, preparation and construction of a long-term/permanent fire pit area.
If you are planning a temporary fire some aspects may not be relevant, but it is still useful to consider most of them.
What you'll need
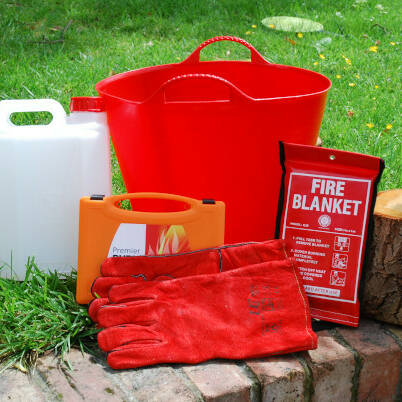
Kit, tools & materials you may need:
- tools – spades, saws, loppers, secateurs, mallets, buckets
- building materials – rope, string, if natural resources not available; fire bricks and gravel
- natural resources – rocks, cut poles, logs, dead wood
- PPE – toe-capped boots, protective gloves
- health & safety – first Aid kit, emergency information and bag
This activity has been provided by
Useful items from our shop
Environmental Considerations
Consider the environmental impact of preparing, carrying out & completing this activity. Could this impact be reduced? Specific considerations for this activity could include:
- permission of landowner
- source of natural materials
Health & Safety Considerations
Follow your usual operating procedures and carry out appropriate risk benefit assessments.
Some considerations particular to this activity include:
- tool use
- safe site use guidelines and maintenance
- keeping the site clean, tidy and well maintained
- rubbish removal/dropped food
- tree health above and around the site
Planning:
Carry out an initial risk assessment of the site and activity, identifying any constraints that need to be understood by participants, such as access points, slopes, waterlogged areas, boundaries, tool use, etc.
Use this assessment to ensure that you have competent staff and appropriate emergency procedures in place before the start of the project.
Create a plan of how the area will be developed outlining realistic timescales for completion of the different stages.
- locate and research a site
- design the fire pit and surrounding area considering constraints and project aims
- calculate resources needed to prepare, build and run the site
- clear and prepare the area
- construction of the site
Carry out a final risk assessment of the site and planned activities, and use this information to help you to safely use and maintain your fire pit area. If other groups are to use the area ensure clear site use guidelines are communicated.
Location:
When identifying a suitable site it is imperative that you gain permission to build a fire pit and to light fires from the land owner/site manager. They may also be able to offer advice about appropriate locations.
Search around your area looking for a flat open clearing. In particular look out for:
- good access & emergency evacuation – short cut to road or pick up point
- flat ground & relatively free from hazards – such as tree stumps and brambles
- over-hanging trees – if there are any over-hanging trees check they will not be damaged by the heat of the fire. It may be necessary to cut back branches. This should be done by a competent person
- plants & fauna – check that there are no rare plants or animal habitats that could be destroyed or disturbed by fire pit construction, fire use and fire-lighting activities. Consider the time of year – there may be nothing there now but what about other times of the year? Asking the woodland manager or owner to help you identify an area that will be less affected by your impact is extremely useful
- investigate the ground & soil – it is important to understand the makeup of the soil at the fire pit site. In woodlands the soil is often made up of material that could be flammable. The soil can be made up of leaf litter and partially rotted organic, carbon-rich material. This creates a peat-like soil and if care is not taken an underground fire may be started without you being aware. In general, dense soil with little air in it is less likely to catch alight. If you are unsure seek expert advice from the woodland owner or a local ranger.
Process: Cut a profile of the soil about 20-30cm deep, inspect the layers and consider if they are flammable. If the soil is dense and it is difficult to dig a profile to this depth it could be due to rocks or clay which are less flammable, in these circumstances a shallower profile may be adequate.
Soil type | Flammability risk |
| Clay | Low |
| Stony soil | Low |
| Brown muddy soil | Low |
| Peaty | High |
| Light, fluffy, woody | High |
| Leaf litter | High |
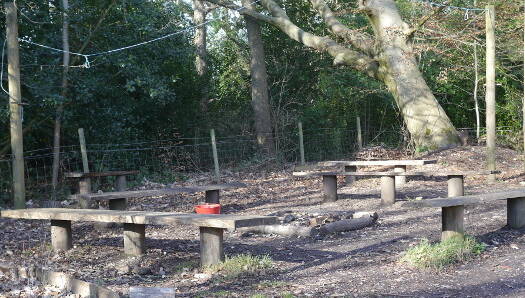
Basic design considerations - fire pit area:
Entry - all members of the group should enter from one side
Entry log - this seat creates a barrier to prevent individuals walking straight up to the fire pit
Direction of movement - walking behind benches prevents people from walking near or across the fire
Wind shelter - this barrier creates a wind break and stops people approaching the fire from a different direction, guiding them into the entry point
Fire exit - this exit is not used regularly – it is for emergencies
Log benches - benches are built to be the correct height to be easily stepped over by your group (should be placed two metres away from edge of fire pit)
Step over - individuals follow the direction of movement and step over the bench from behind and sit down
Fire pit see fire pit designs
Exit - each person exits from this point to avoid collisions
Safety distance - benches set at least 2m back from the edge of the fire pit.
Preparation
Clear the area. The whole fire pit area needs to be free from hazards to avoid trips, impacts and spillages. particularly if hot food or liquid is being transported.
| Hazard | Description | Action |
| Plants, brambles | Often plants such as brambles create significant trip hazards by looping over feet as you walk past them. | Dig out from root or cut back close to ground. Wear protective gloves to remove plants. |
| Logs, sticks | It is not practical to remove every stick but it is important to remove anything that has potential to create a trip or slip hazard. | Collected wood can be stacked for firewood, fence and den building, or to create a habitat pile. |
| Tree stumps | Tree stumps, especially small ones, create significant trip hazards. Larger ones, if the surface is not roughened, create slip hazards when stood upon. | Dig out small stumps and cut roots or incorporate them into a fence or bench. Make large stumps visually obvious, or turn into tables or seats |
| Holes, lumps | Holes can occur following the removal of tree stumps, or may occur naturally. | Fill in all holes. When settled, level off and flatten down any lumps. |
| Roots | Often roots are not exposed initially but after the site has been used for a period roots become exposed and may cause trip hazards. | Will cutting and removal affect a tree or plant? If so, look to make the root visually obvious or build a bench or table over the top. |
| Over-hanging branches | The heat from the fire may dry out over-hanging branches, damaging the tree and causing a potential fire hazard. | Using safe procedures and appropriate tools, cut down any branches that may become a hazard. |
Construction:
Mark out site - ideally mark out your site with pegs and string, or lay out sticks and logs to represent the plan. Start in the centre of your area and use a piece of string to measure the radius of the site to one of the edges. Use a stick to draw around the site keeping the string taut at all times and circling the centre point.
1. Mark fire pit starting from the centre
2. Measure out from the outside edge of the fire pit to the benches
3. Measure out from benches to the fence
4. Identify entry direction and emergency exit.
Delegate tasks - if working with a large group, delegate tasks appropriately to competent instructors working with small groups.
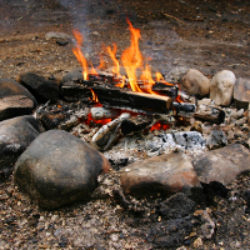
Fire pit - clear soil to chosen depth (depending on soil type). Shore up sides with rocks or bricks. Create flat pan-stands next to the pit if required. These can be very useful when cooking. Hot pans placed on uneven surfaces may tip and spill contents.
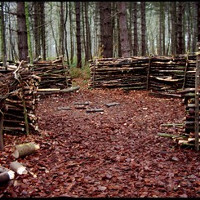
Fence making - agree a shape and construction method. Collect resources required. Cut poles using safe sawing and cutting techniques and correct PPE (Personal Protective Equipment).
Bench making - agree shape and construction method. Collect resources required. Cut logs using safe sawing techniques and PPE. Place benches in the allocated places a safe distance from the edge of the fire pit.
Bag and coat store - to prevent bags and coats being left near the fire creating fire and trip hazards – allocate a position for all bags and coats to be hung or placed when not in use, preferably outside the fenced area.
First aid point - specify a position where the burns first aid kit and emergency water are to be permanently located when the site is in use.
Handy hints:
Fire pit development can happen over the duration of a project. Once the essentials have been put in, different parts can be added as and when you want.
Partnerships - if your group is not at a stage to be able to build their own fire pit, try to locate other projects locally where older groups may come to your site to construct a fire pit area for you. Consider running a parents’ training day to get parents involved and interested in the project. This can be particularly useful for engaging fathers and often results in higher numbers of parent helpers offering to help in the future. This training could be an excellent way to address fears about fire-lighting and allow parents to experience the benefits of building a fire area and then using it.
Store wood in a dry place - for the next fire-lighting session.
Suitable materials - it is important to use suitable rocks or bricks. If they contain water the rocks may explode or split if subjected to intense heat.
Seeking advice - the woodland owner or manager is the first person to contact, then local groups such as conservation groups, wildlife trusts, forestry commission and local woodland rangers at the council.
Fire pit options:
Our guidelines on fire area design highlight important considerations, however, due to the constraints of your site and the aims of your project, you might not include everything discussed in this guide. Your design may have a very different shape or approach routes to suit your theme or site. These guidelines highlight safety issues that should be considered and adapted for any design of fire area. Follow this link for more information on fire pit designs.
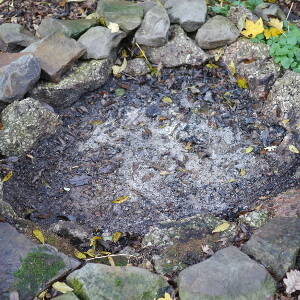
If you have built a sunken pit, due to the surface soil being flammable, an outer safety ring is recommended. Remove flammable leaf litter from around your border rocks to create an air gap of 10cm. The gap between the border and the safety ring can be left empty or filled with gravel to make the area more stable.
Disclaimer: Muddy Faces cannot take any responsibility for accidents or damage that occurs as a result of following this activity.You are responsible for making sure the activity is conducted safely.
Key Features
- Age Range 6+
- Duration Less than an hour
- Location Anywhere
- Season Any
- Time of Day Anytime
-
Categories:
Fire, Shelters & Bushcraft
fire