Make a campfire cooking fork
Make a campfire cooking fork -simple to make and perfect for cooking little tasty treats like pieces of apple!

Introduction
Cooking forks or toasting forks are a really useful campfire cooking tool. This activity shows you how to make a simple pronged fork and gives a few ideas of what to toast!
Build a cooking campfire and while you are waiting for the fire to be ready for cooking you can prepare your cooking fork.
What you'll need
- pole/long stick
- softwood palm drill
- cocktail sticks or bamboo skewer
- work gloves
- fire ready for cooking
- bowl
- apples
- sugar & spice and all things nice!
This activity has been provided by
Useful items from our shop
- Softwood Hand Drill - Set of 3 (Kids at Work)
- Rustic Den Pole - 100cm
- Hobbyists Clamp
- ERGO Heavy Duty Bow Saws
Environmental Considerations
Consider the environmental impact of preparing, carrying out & completing this activity. Could this impact be reduced? Specific considerations for this activity could include:
- seek landowners permission to light fire
- keep smoke to minimum – burn seasoned wood
Health & Safety Considerations
Follow your usual operating procedures and carry out appropriate risk benefit assessments.
Some considerations particular to this activity include:
- food hygiene
- fire safety
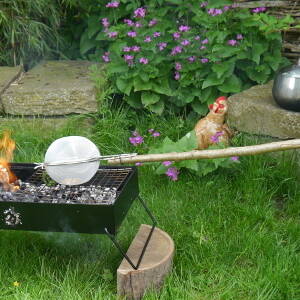
Step #1 Make your fork
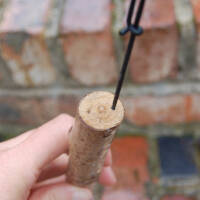
Carefully make two holes in one end of your pole using a softwood hand drill (use a screwing action in and out).
Make the holes deep enough so that cocktail sticks won’t fall out.
SAFETY TIPS:
It is not ideal to drill towards your hand so if you can clamp the stick then this would be much safer than holding it whilst drilling. A protective glove could also offer some protection.
Next, push the cocktail sticks (or cut pieces of bamboo skewer) into the holes, ensuring they are secure.
Hey presto! You have created your cooking fork.
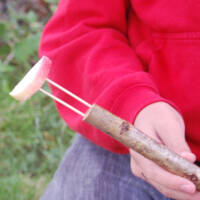
Step #2 Put the food on the fork
Choose the item you want to cook - we have gone with apple - a healthy alternative to marshmallows! Even better if you can use apples picked locally.
Cut the apple into slices and prong them with your new campfire cooking fork.
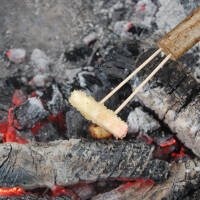
Step #3 Ready to cook
Hold the apple on the cooking fork near the hot embers and begin to cook.
The juice in the apple bubbles and often runs, so ensure the apple is not held above any parts of the body when it is being moved about.
It’s a matter of taste how long you cook it for, but aim for it to go a bit mushy and the juice to bubble.
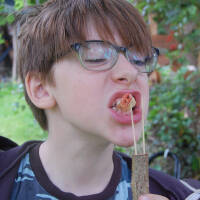
Step #4 Ready to eat
Leave to cool for a minute or two, then enjoy and prepare your next slice!
You can also make toffee apple slices as an alternative. Instead of allowing the apple to cool, while it is still hot dip it in some brown sugar (with cinnamon or nutmeg if you want to add extra flavour) then return to the heat until the sugar is all melted. Remove from the heat and allow to cool, hopefully the sugar hardens and you have a mini toffee apple!
Take it further:
- try using the campfire cooking fork for sweet chestnuts, marshmallows and sliced bread!
- for more inspiring fire cooking activities look at our INSPIRATIONS – fire activity.
Disclaimer: Muddy Faces cannot take any responsibility for accidents or damage that occurs as a result of following this activity.You are responsible for making sure the activity is conducted safely.
Key Features
- Age Range All Ages
- Duration Less than an hour
- Location Anywhere
- Season Any
- Time of Day Anytime
-
Categories:
Tool use & Traditional Crafts
Fire, Shelters & Bushcraft
fire
Food Outdoors
campfire cooking