Elder whistle
A whittling activity using elder to create your very own whistle!
Introduction
Elder is a great wood to work with if you want to create tube-shaped items such as beads and whistles.
Look at our INSPIRATIONS - elder for more things to do with elder.
What you'll need
- pieces of elder - 10-15cm in length
- whittling knife
- anvil secateurs
- tent peg or long nail
This activity has been provided by
Environmental Considerations
Consider the environmental impact of preparing, carrying out & completing this activity. Could this impact be reduced? Specific considerations for this activity could include:
- source wood sustainably (see Tips for foraging)
Health & Safety Considerations
Follow your usual operating procedures and carry out appropriate risk benefit assessments.
Some considerations particular to this activity include:
- tool use

Step #1 Prepare your length of elder
Using secateurs, cut off a piece of elder.
You need a straight piece, 10-15 cm in length and approximately as thick as your forefinger.
Avoid pieces with branches or leaf nodes as the pith becomes thin at these points.
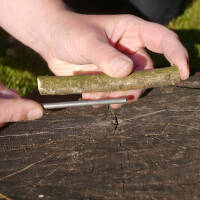
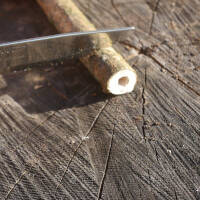
Step #2 Remove the pith
Poke the pith down into the piece of elder using a tent peg or similar blunt item.
Don’t poke it all out of the other end, aim to leave 2-3 cm left in the bottom. Mark the depth using the peg as a guide.
Keep scraping with the peg until all the pith is cleared away.
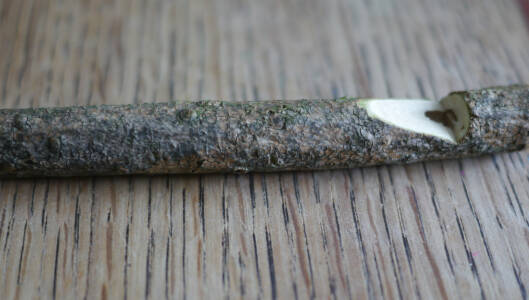
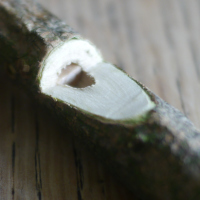
Step #3 Create the window
To carve out the window in the whistle, first make a cut with a knife or a hacksaw approximately 1 -2 cm down from the end that has had the pith removed.
Cut down to halfway through the piece of wood.
Position a knife 1.5 cm below the first cut and carve up towards the cut.
Keep shaving pieces off until you can see the pithy layer and have created a hole. You may need to increase the depth of the cross-cut and keep shaving to make the hole the right size.
Tip:
Aim to remove all bits of loose pith around the hole you have just created and within the whistle.
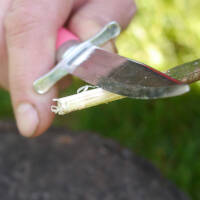
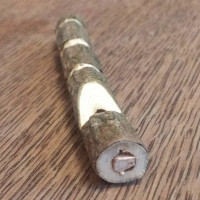
Step #4 Prepare the inside stick
Find a piece of wood (without pith) about the diameter of the space that the pith took up. Initially work with a longer length than needed (approx. 8 cm). If it is too wide you can whittle it to make it fit. Keep checking as it needs to be a snug fit.
Tip:
Keep this piece long until you get the fit right. It will be easier to pull it in and out of the top of the whistle as you make your adjustments.
This inner stick needs to sit inside so it sits level with the top of the window (see image). When it fits carve off a flat section (just over 1 mm) all along the length that will sit inside the whistle.
Tip:
Keep this piece long until you get the fit right. It will be easier to pull it in and out of the top of the whistle as you make your adjustments.
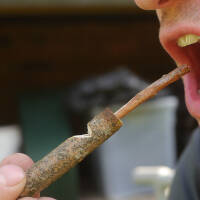
Step #5 Find the whistle
Keeping the inner stick long, test the whistle.
If it is not whistling check again for debris/loose bits or you could also see if making the window bigger by shaving off a bit more of the wedge helps. We had to do this – as you can see the whistle in the large photo at the top has a bigger, more shallow window.
Keep testing the whistle and making fine adjustments.
If it still doesn’t make a strong sound take a little bit more from the inner stick to make the hole you blow through bigger.
Tip:
Remember to make all adjustments slight as you can always take more off, but if you take off too much you can’t put it back on.
The air travels through the whistle over the stick and hits the window. Moving the stick back and forth enables you to hear the result of the airflow being disturbed and hitting the window.
When you get a good sound you can cut off the end of the inner stick so it is level with the top of the whistle.
Take it further:
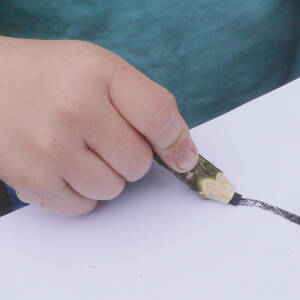
- decorate your whistle by whittling patterns in the bark using a knife
Disclaimer: Muddy Faces cannot take any responsibility for accidents or damage that occurs as a result of following this activity.You are responsible for making sure the activity is conducted safely.

Key Features
- Age Range 6+
- Duration Less than an hour
- Location Anywhere
- Season Spring
- Time of Day Anytime
-
Categories:
Tool use & Traditional Crafts
knives