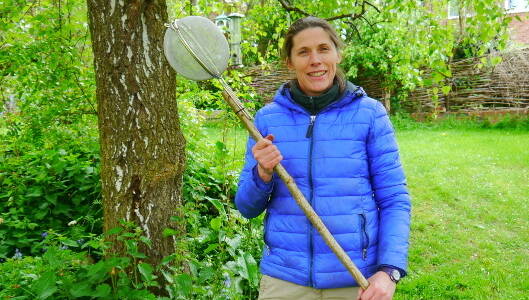
Make a sieve popcorn cooker
Cooking popcorn in sieves is a wonderful visual experience - here's how to make your own.
Introduction
Making your own popcorn sieve cooker is a great way to cook popcorn so you can hear and see the kernels changing form.
Have you ever thought about why the kernels pop? In the centre of the kernel is a small amount of water, and as the kernel heats up so does the water. As the water changes to steam it expands and the increase in pressure causes the kernel to explode!
There are many ways to make your popcorn maker and lots of different people will have a preferred method. The following method has been developed to help overcome niggly, problems like the whole lot falling off the end of your pole into the fire and also to give you some nifty tips for quick release.
What you'll need
- pole/stick approx. 100cm in length
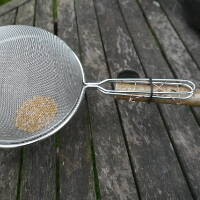
- 2 x stainless steel sieves*
- wire cutters/pliers
- thin steel wire approx. 50cm
- work gloves
This activity has been provided by
Environmental Considerations
Consider the environmental impact of preparing, carrying out & completing this activity. Could this impact be reduced? Specific considerations for this activity could include:
- source of pole
- ensure all discarded wire is collected
Health & Safety Considerations
Follow your usual operating procedures and carry out appropriate risk benefit assessments.
Some considerations particular to this activity include:
- using tools
- sharp wire
- food safety - popcorn not recommended for children aged 5 and under (choking hazard)
Note:
* The type of sieve is important for the longevity of your sieve cooker - try to avoid fine aluminium, obviously plastic, and mesh sieves, as the wire is much thinner and too closely weaved.
* Use 2 sieves of the same size.
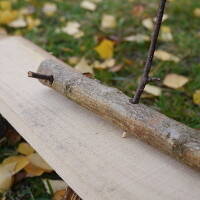
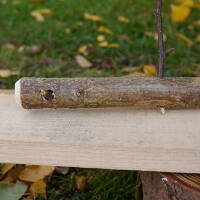
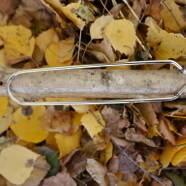
Step #1 Drill a hole at the top of the pole
The pole needs to be approximately 1 metre in length. Adding these drilled holes will give the wire a static place to grip, as they can often slip up and down the outside of the pole.
The pole needs 2 holes drilled through it –
- 1 an inch from the ‘top’ of the pole (to prevent side to side movement of the sieve)
- the other to hold the base of the sieve handle in place (to prevent movement up and down) – see below for how to locate the spot for the 2nd hole
Make sure your pole is clamped securely in place before drilling. See our drilling a pole guide for more info.
Step #2 Mark up the position of the 2nd hole
Once you have made the first hole in your pole you are ready to mark up the second hole.
Place the pole on the workbench with the ‘top’ hole in a horizontal plane (twist the stick 90 degrees from 1st hole).
Place the sieve in position on the pole ensuring that the top of the sieve handle (nearest to mesh) is above the ‘top’ hole in the pole.
Mark up the second hole just below the bottom of the handle.
Step #3 Drill the 2nd hole
Reposition and clamp the pole on the workbench ensuring that the hole at the ‘top’ of the pole is still in a horizontal plane (twisted 90 degrees from the 1st hole).
Drill your 2nd hole and your pole should look like this (see image right). We have added the sticks so that you can see how the holes should look.
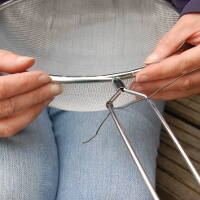
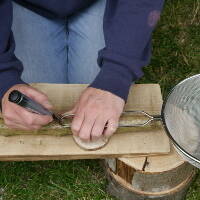
Step #4 Attach the wire to the sieve
Attach the wire to the sieve handle by wrapping the wire securely around one side of the handle at the top nearest the mesh of the sieve.
Step #5 Attach the sieve to the pole
There is no right or wrong way to attach the sieve to the pole. The main aim is for the sieve not to slip around when in use as a popcorn cooker.
Place the sieve on the end of the pole with the mesh bowl facing upwards (this enables the second sieve to be fitted without the pole being placed inbetween the two sieves, which would prevent it from shutting).
Thread the loose end of the wire that is attached to the sieve handle through the top hole.
Remember to keep pulling the wire tight at each stage of the wire fixing. If your wire is a little stiff you may need pliers to pull it tight.
We wrapped the wire around the other side of the handle then went back through the hole, around the handle and back through the hole again (pull the wire taught as you go and use pliers if necessary).
Finish by wrapping around the handle to secure the end. Any excess wire can be trimmed off or tidied up to avoid leaving sharp ends sticking out (we poked the end into the hole to stop it sticking out).
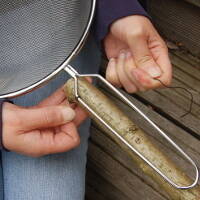
Step #6 Attach sieve handle to 2nd hole
We made the 2nd hole perpendicular to the 1st hole to provide an anchor for the sieve, to prevent it from moving up and down. Wire the sieve to the bottom hole in a similar method to wiring up the 1st hole.
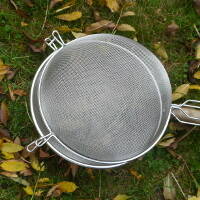
Step #7 Attach the 2nd sieve
Now the sieve is secure you can place the other sieve on top and create a hinge – to allow kernels to go in and popcorn to come out at the end.
Fasten the horns together with wire or clips.
If your sieve doesn’t have horns like these ones you will need to use a central hinge directly through the sieves. We have used little clips as they are a little less fiddly than wire. Small rings from key rings would also work well.
The sieves should now be hinged together.
Step #8 Holding the two sieve handles together
We now need a mechanism for holding the sieves closed when cooking. Most people would just wrap some wire around and unwrap it to release which works fine or create a moveable ring with wire.
We came up with a handy idea using O-rings.
Slide the O-ring onto the pole (opposite end to sieve) then roll it along until it reaches the sieves. Close the sieves together and roll the O-ring over to hold them shut.
When you want to release the sieves; roll off, refill, then roll on again.
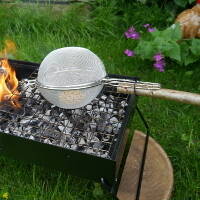
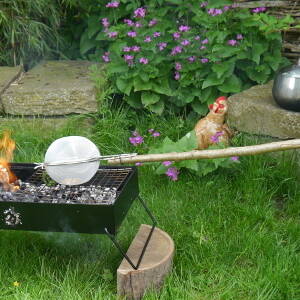
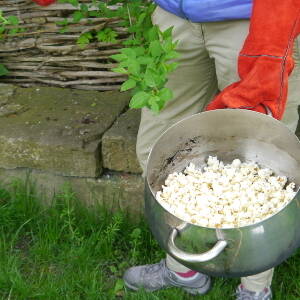
Step #9 Ready to cook!
You are now ready to pop your corn! Have a look at our activity: cooking popcorn in sieves.
Disclaimer: Muddy Faces cannot take any responsibility for accidents or damage that occurs as a result of following this activity.You are responsible for making sure the activity is conducted safely.
You might also like
Key Features
- Age Range 6+
- Duration Less than an hour
- Location Anywhere
- Season Any
- Time of Day Anytime
-
Categories:
Fire, Shelters & Bushcraft
fire
Food Outdoors
campfire cooking
Activity Downloads