A guide to using clay or cuttlefish bones to create a cast for pewter.
Introduction
There are different ways to make moulds; in this guide we explore cuttlefish bone and natural clay casts. Like so many things, the time spent in preparation to make a good cast will be rewarded in the quality of the final piece.
What you'll need
cuttlefish bone or clay
wooden board
small items to make your mould shape – natural materials including shells, acorns etc, and/or small trinkets/toys etc
Consider the environmental impact of preparing, carrying out & completing this activity. Could this impact be reduced? Specific considerations for this activity could include:
the fire area
any metal left in the environment
source & type of clay.
Health & Safety Considerations
Follow your usual operating procedures and carry out appropriate risk benefit assessments. Some considerations particular to this activity include:
using carving tools
burn potential from molten metal and fire.
What is cuttlefish bone?
Cuttlefish bone is an interesting material to carve and cast with; its unique qualities give a yellowish/gold tinge to pewter.
Cuttlefish are small, squid-like cephalopods. They have a parrot-like beak and eight arms, as well as two tentacles, and eat mainly crab and shrimp.
A cuttlefish bone is not a bone, but rather the internal shell of the cuttlefish. It is filled with gasses and helps control the fish’s buoyancy in the water.
Cuttlefish are common in the English Channel so the distinctive cuttlefish bones can be easily found on the right beaches. What an amazing project to go and find your bone then turn it into a cast!
People have harvested and used cuttlefish bones for many different purposes over the years: it was ground up to make polishing powder used by goldsmiths; used as an artistic carving medium during the 19th and 20th centuries; and added to toothpaste. Today cuttlefish are commonly sold in the pet industry as a calcium supplement.
Creating a cast with cuttlefish bone:
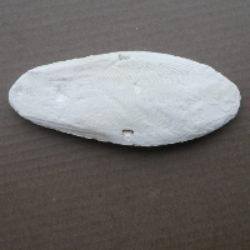
As cuttlefish bone is able to withstand high temperatures and is easily carved, it is a practical mould-making material for small metal castings for the creation of jewellery and small sculptural objects.
It has a hard side and a softer side; this needs to be identified first to ensure you are carving into the softer side.
There are two ways to create a cast: you can place the cuttlefish flat and pour into the mould (A) or place two halves together to create a 3D effect (B).
a) Carving into one piece:
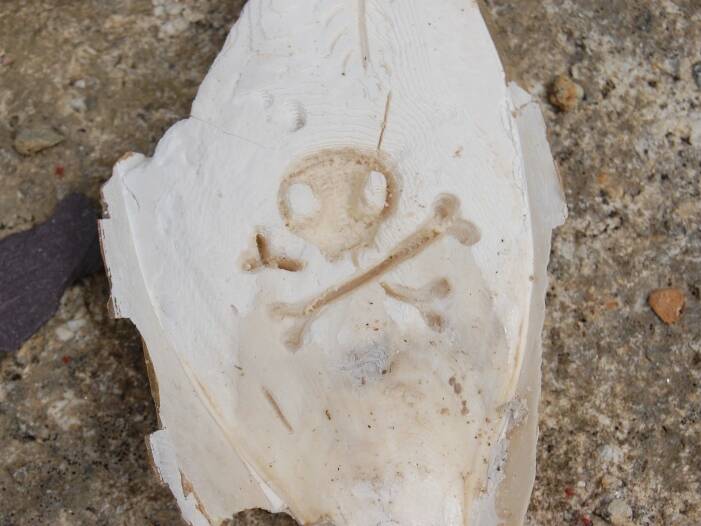
Press the item to be used into the soft side of the cuttlefish then brush away any debris/dust/material.
Repeat until you have a full imprint and are happy with the design. A bit of assistance may be required with a skewer/cocktail stick or fine carving tools to help carve out the required negative shape ready for casting.
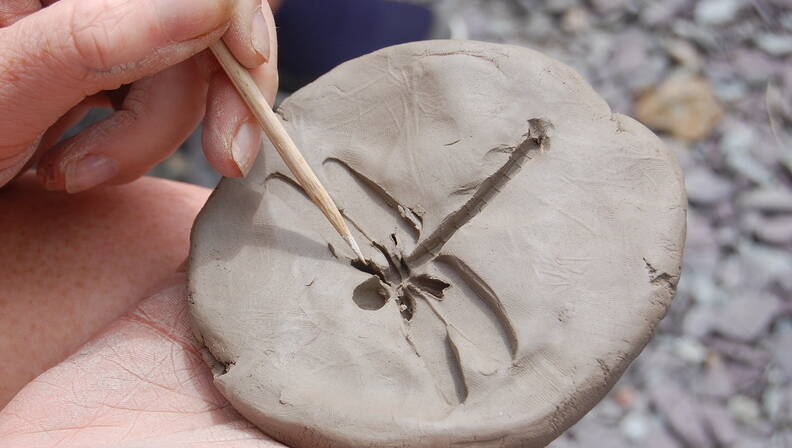
Alternatively use a skewer to scrape away your own freehand design.
After casting, the finished piece will be flat on the top/back surface and 3D on the bottom/front surface.
b) Using two halves to create a 3D cast:
Cut a large cuttlefish bone in half and run the soft sides on sandpaper, or even just together, until they fit flush against one another.
Press the item to be used into the soft side of the cuttlefish then brush away the material – a bit of assistance may be required with a skewer/cocktail stick or fine carving tools.
To create a full 3D effect the opposing side also needs to be worked.
Once you are happy with the carving and the sides fit flush together either drill guidance holes or mark both halves of the cuttlefish so they will line up together correctly.
Cut out a sprue (a channel through which the molten metal can flow). A cone shape is ideal to allow the pewter to drain into the mould.
Cuttlefish designs tend to be more rough than clay designs so consider how the pewter will lie and how deep you will fill the cast.
Creating a cast using clay:
Clay is an excellent material to make a cast; it can be moulded in many ways and can support some super imprints such as acorns, shells and leaves. You can also mould clay with your fingers and sculpting tools to create unique designs.
You can collect or buy clay for making casts. If you are collecting your clay consider the environmental impact of the process and always get the landowners permission. If you are buying clay, avoid air-drying clay as this contains nylon fibres; a natural clay is ideal.
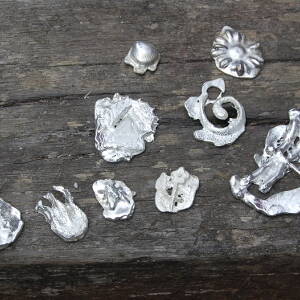
Items can be pressed into the clay to create an imprint which creates a perfect mould. Below you can see some different imprints and the resulting pewter cast objects.
The wizard hat (bottom right) was created by pressing clay around a shell and twisting the shell out to help keep the ridges distinct.
A cocktail stick was also pressed through the mould to create a hole for threading.
Final steps:
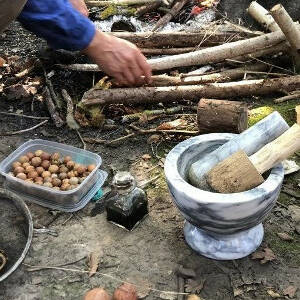
For both methods of creating a cast, the final step before pouring in any pewter is to create a wall of clay around your cast to keep the pewter in place. This also creates a shape around the cast which can be used in the final design.
The clay or cuttlefish bone moulds need to be placed on a casting board; use blobs of clay to secure and keep the mould level ready for casting.
Top tip:
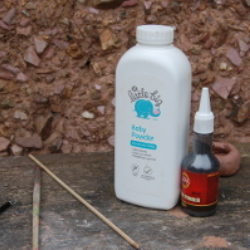
Use talc or graphite powder to lightly dust the moulds in order to reduce surface tension. Reducing surface tension enables the molten metal to flow evenly around the mould indentations.
Be sure to brush the talc evenly into all areas and remove any excess powder. Blowing through a straw could remove any build up of powder in crevices. This will leave a very fine coating of talc in the mould.
Disclaimer: Muddy Faces cannot take any responsibility for accidents or damage that occurs as a result of following this activity.You are responsible for making sure the activity is conducted safely.