How to extract/tap birch sap
Collect super-sweet natural tree syrup with just a few simple tools and a little time and patience.
Introduction
In the autumn birch trees collect and store nutrients in their roots. This helps with new tree growth in the spring.
In the spring the tree has a period of sap flow that starts when root pressure changes and stops when leaf growth starts. The sap from silver birch trees can be drunk directly, used to make wine or cordial, or reduced-down to make a syrup.
What you'll need
- auger bit
- carpenter's brace (rotary drill that fits a large bit)
- food-grade pipe
- wooden plug or cork the diameter of the pipe
- elastic bands
- calico squares/cotton/muslin
This activity has been provided by
Useful items from our shop
Environmental Considerations
Consider the environmental impact of preparing, carrying out & completing this activity. Could this impact be reduced? Specific considerations for this activity could include:
Health & Safety Considerations
Follow your usual operating procedures and carry out appropriate risk benefit assessments.
Some considerations particular to this activity include:
- tool use
Health benefits & risks:
Birch sap is a source of vitamins, minerals and sugars including Vitamin C, iron, potassium, calcium, magnesium, phosphorous, zinc and others. It can be used to help urinary tract problems and as a general detoxifier.
The silver birch is easily identified and there are few hazards. There have been recordings of the tar in the bark causing skin irritation.
Does tapping harm the tree?
The simple and honest answer to this is yes, as we are drilling a hole into the tree. However birch are resilient and can naturally heal any damage caused from drilling. It is important to choose a healthy tree and consider if the tree may be struggling to get water due to environmental conditions. The main threat to the tree is if infection is allowed to enter the hole, so it is important to plug the hole after you have finished.
This is quite an involved activity and we recommend that you carry out additional research and reading to see how others do it.

Preparation:
- you must have permission from the tree- or land-owner before harvesting
- collect and clean all your equipment.
- you can use an auger bit with sharp spurs as a hand brace or low-speed power drill. Augers/bits should be sharp and clean
- prepare a plug to put into the hole afterwards (see step 6).
- any sap collected should be refrigerated and kept for a maximum of 2-3 days.
Step #1
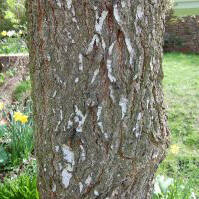
Identify the tree you are going to tap.
Make sure you have permission from the owner first.
Select an established and healthy-looking tree.
Although you can tap most sized trees and saplings it is better to choose a mature tree at least 20cms (8 inches) diameter.
If you are in woodland and there are a number of trees all competing for light, choose one with a larger canopy/crown area as these trees should have a better sap flow.
Do not tap trees that are likely to have been exposed to pesticides, petroleum or other toxic substances. This would be trees alongside a maintained road, or in other locations that have soil pollutants. Be aware that birch trees are a pioneer species – often first to get rooted on industrial land that has been left unused.
Step #2
Check the sap is flowing.
Sap can start flowing at different times and can stop as quickly as it starts. It has been known to start as early as the last week of February in the south, and as late as the end of April in the north of Scotland. Generally the best time is when the temperature is between 0-15 degrees - this often occurs in March, particularly the middle two weeks.
To check if the sap is flowing push a sharp knife through the bark into the wood, upwards at an angle. If it is flowing, sap should run down the knife and drip off.
Step #3
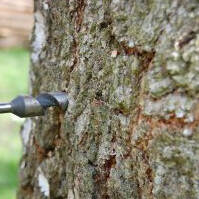
Drill a hole in the tree approximately 1m from the ground, using an electric hand drill or carpenter’s ratchet brace.
The hole should be around 1cm diameter - I used a 19mm drill bit because that was the size of my pipe.
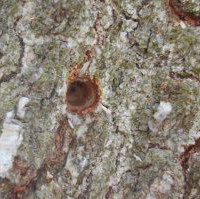
There are different opinions about how big the hole should be, with suggestions up to 5cm in diameter, but I felt this was too big and was anxious about drilling too large a hole in my lovely tree.
The recommended depth of the hole also varies. I would have thought it would be relative to the size of the tree but I couldn’t find any formula for this (if you know of any please let us know and we’ll update this post). I took mine to a depth of about 8cm.
Step #4
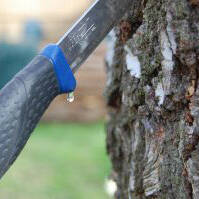
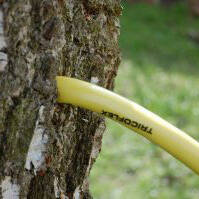
Insert the loose end of your clean, food-grade pipe into the hole, ideally to a depth of about 2cm.
Push the pipe in hard to create a tight seal. If the pipe is loose most of the sap will run out and down the tree.
If the sap does not run as a clear liquid discard the attempt and move onto another tree.
If the sap is clear, put the other end of the food-grade pipe into your collection vessel.
Step #5
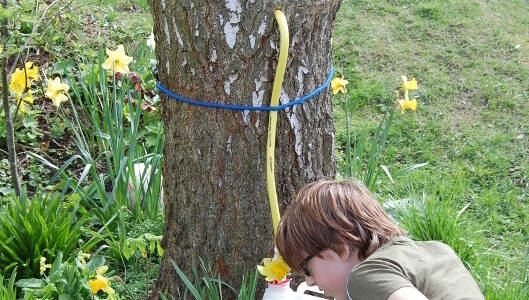
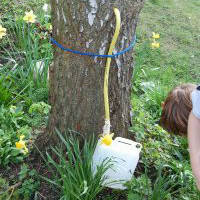
Prepare the set-up to be left.
Seal any gaps in the join between pipe and collection container to prevent any unwanted guests getting drunk on your sugary sap. We used a piece of calico tied around with elastic bands. I snipped the bands and tied them around, placing one higher up on the pipe and one lower down over the container mouth. and one in the middle for good luck.
Our pipe was quite strong so we secured this to the tree with a bungee.
We recommend also securing the container to the tree - as it fills it becomes quite heavy and can easily slip off the pipe and all your lovely sap could be lost into the ground.
Leave the secured set-up for a good length of time e.g 24 hours. You will be surprised how quickly it will fill up so, if you can, check on it periodically during that time.
Step #6
Remove your pipe and plug the hole.
Cut a clean branch the same diameter as the hole and sharpen it slightly at one end - hammer it into the hole.
Or use a tight-fitting cork.
There is growing opinion that blocking the hole up afterwards is more likely to lead to infection, as it slows down the tree’s natural process of producing protective substances around the damaged tissue. I think this makes sense as, naturally, trees can have limbs knocked off or be damaged by gnawing animals, and they are able to effectively protect these wounds and repair themselves.
Currently standard practice is to plug the hole - if nothing else it prevents the loss of nutritious sap, but I think soon the general consensus will change to leaving it unplugged.
Step #7
Once collected, keep sap refrigerated and use or process within 2-3 days.
You can freeze it but you’ll need a freezer space big enough!
Birch sap goes off quite quickly. When collecting, ideally do not leave the sap standing for too long – definitely no longer than 48 hours – and, if the temperature is above 10 degrees, aim to collect and refrigerate it within 24 hours.
If left too long the yeasts start fermenting and this will affect the taste and chemical properties of the sap. Once it goes off, even if you boil the syrup down, the bad taste will be apparent in the reduced state as well.
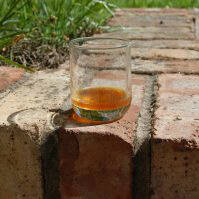
Take it further:
- make birch sap syrup - this has a much longer shelf-life - if stored in a sterile, airtight container it can last up to two years
- the main downside of making syrup is that it is incredibly energy-intensive - the birch sap has a very high water content (approx 95%). The majority of this needs to be boiled off, which takes hours. We only had a small amount of sap to begin with and ended up with a tiny amount of syrup.
Disclaimer: Muddy Faces cannot take any responsibility for accidents or damage that occurs as a result of following this activity.You are responsible for making sure the activity is conducted safely.
You might also like
Key Features
- Age Range All Ages
- Duration A week or so
- Location Anywhere
- Season Spring
- Time of Day Anytime
-
Categories:
Food Outdoors
foraging