Clay rabbits
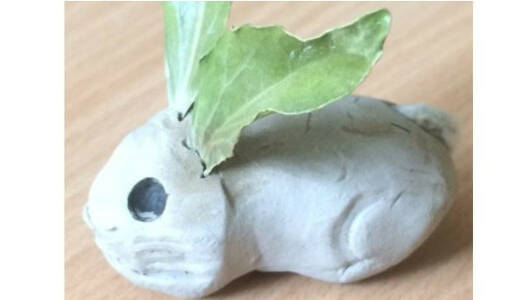
A simple clay craft activity making the most of the lovely furry catkins in abundance in the spring.

Introduction
Clay is a wonderful malleable resource for all sorts of creative projects.
* Muddy Faces actively promotes child-led outdoor play & learning. We recognise and believe in the curiosity that children have and their drive to explore and discover. We hope that you will bear this in mind when considering more prescribed activities like this one – often much more creative ideas will occur if resources are simply provided and children are given the time and space to explore independently.
What you'll need
- Leaves for ears - it is always best to give kids the experience and practice of picking their own leaves but bring some in on a branch if you have to.
- Catkins - we used willow, whatever you can find that gives the fluffy tail experience.
- A stick and a pencil sharpener - you don’t need clay tools to make marks in the clay – make your own pointy sticks with a sharpener.
- Seeds, berries, stones - whatever is available for the eyes that are the right shape and size.
This activity has been provided by

Useful items from our shop
Environmental Considerations
Consider the environmental impact of preparing, carrying out & completing this activity. Could this impact be reduced? Specific considerations for this activity could include:
- source of natural materials
Health & Safety Considerations
Follow your usual operating procedures and carry out appropriate risk benefit assessments.
Some considerations particular to this activity include:
- collecting natural materials
Step #1
Make a ball of clay approx 10cm in diameter.
Step #2
Roll the ball slightly to make an oval shape.
If you want to give the rabbit a separate head (for older children) then attach a smaller ball of clay to the body with a short stick.
Step #3
Sharpen a stick to make a pointed end (we made some clay lambs out of the lovely shavings we had at the end).
Use the end to carve details onto the clay to make it look more like a rabbit, e.g. a nose, some whiskers, back legs.
Step #4
Choose two matching leaves for ears.
Poke two small holes to push the ears into, push the clay together around the base of the ears to improve the support.
Step #5
Press the eyes into the head - ours fell out over time so we just coloured in the sockets with a sharpie (don’t be tempted by googly eyes… think of the plastic!).
Step #6
Add the final important touch - the soft catkin tail - and press it in so the clay holds it.
Disclaimer: Muddy Faces cannot take any responsibility for accidents or damage that occurs as a result of following this activity.You are responsible for making sure the activity is conducted safely.
Key Features
- Age Range All Ages
- Duration Less than an hour
- Location Anywhere
- Season Spring
- Time of Day Anytime
-
Categories:
Art & Creating
mud, clay & sand


